Step-by-Step: Replacing a Faulty USB Port on Your Laptop Motherboard
Replacing a soldered USB port is one of the most challenging DIY repairs, reserved for those with advanced technical skills and the right tools. This procedure is often the final solution for a persistent laptop usb not working issue that has been diagnosed as a physical port failure. It requires precision, patience, and a steady hand, as you will be working directly on the laptop's motherboard. This guide outlines the complex process, emphasizing the risks involved, which include permanent damage to your motherboard if done incorrectly.
The foundation of a successful repair is preparation and the correct tools. You will need a quality soldering station with a fine tip, soldering iron, desoldering braid or a solder sucker, high-quality leaded solder, and flux. Crucially, you must have an ESD (Electrostatic Discharge) strap to prevent static electricity from destroying sensitive motherboard components. You will also need a replacement USB port that is an exact match for your laptop's model. Using the wrong part or poor-quality tools will almost certainly lead to failure and further damage.
The first physical step is to completely disassemble the laptop to gain access to the motherboard. This process varies greatly by model but generally involves removing the bottom case, battery, keyboard, and any other components obstructing the motherboard. Take photos at every stage and keep screws organized in a labeled container. The goal is to carefully extract the motherboard and locate the faulty USB port on the circuit board. You must work on a clean, static-free surface to prevent contaminating or damaging the motherboard.
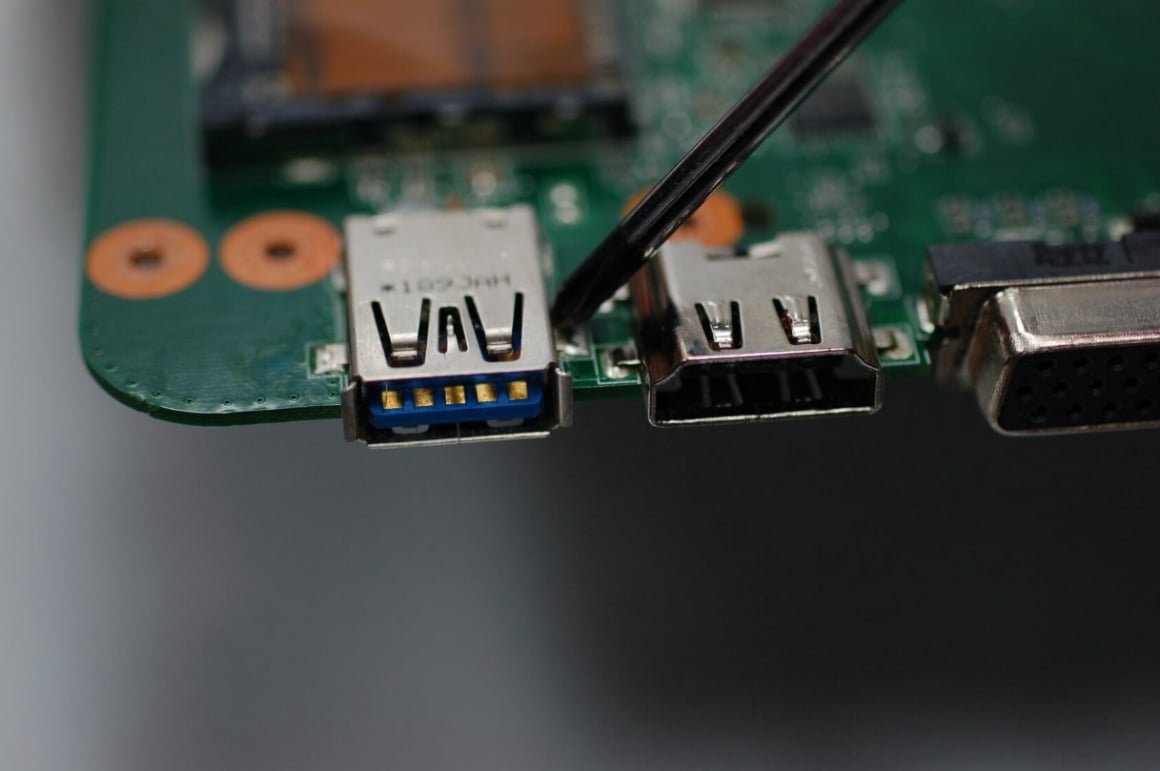
With the motherboard secured, the delicate task of desoldering the old port begins. Apply a generous amount of flux to the multiple solder pins and the ground tabs holding the port to the board. Use your soldering iron and desoldering braid to carefully wick away the old solder from each pin. You may need to apply heat to several points simultaneously to free the port. Extreme care must be taken not to apply excessive heat for too long, as this can lift the delicate copper pads from the motherboard, rendering it beyond repair.
Once the old port is removed, you must clean the solder pads on the motherboard thoroughly with isopropyl alcohol and a brush. This prepares the area for the new port. Place the new USB port into position, ensuring it is perfectly aligned and sits flat against the board. Use a piece of tape to hold it in place. Using your fine-tipped soldering iron and fresh solder, carefully solder each pin to its corresponding pad. Good lighting and magnification are essential here to avoid creating solder bridges between the tiny, closely spaced pins.
After soldering, the final and critical step is inspection and reassembly. Visually inspect your work under magnification to look for any solder bridges or cold joints. Use a multimeter to check for short circuits between pins and to verify connectivity. Once confident, you can begin the meticulous process of reassembling your laptop. After full reassembly, the moment of truth arrives: power on the device and test the new port. A successful repair will have resolved the laptop usb c port not working issue, restoring full functionality to your device.